Sunday, March 31, 2013

Happy Easter and Great news!!!

Hi all!  Happy Easter!!!  I hope you've had a Blessed day spent with family and friends!  I wanted to share a card I made for the MFT guest designer challenge.  I used one of their sweet Doodle Garden images called Hunny Bunny.  I colored her with copics, adding a pleated look to her shirt, and cut her out using the "out of the box" technique.  The button is from the Blueprints 1 (cannot WAIT to see what other Blueprints they have in store for us!).  The two little tabs on the left are from the mix & match banners die-namics.  The sentiment was cut out using the LLD Accent It - Flags & Tags, I just ran it through twice to cut it to the length I needed.  And tucked under the button and sentiment is a bit of the oval chain border .  I ran the border and the dp layer behind the main image through with an embossing folder and sanded the polka dots for extra detail.


Now for the GREAT news!  I am a part of the Sister Act Card Challenge Design Team!  WOOT!  WOOT!  We will have WEEKLY Anything Goes challenges starting THIS FRIDAY that are often sponsored by different stamp companies!  I know y'all LOVE a good challenge, so be sure to stop by and GET INSPIRED!!!

Thanks for stopping by and see y'all SOON!

Thursday, March 21, 2013

An oldie but goodie - Felt Cup Coozie tutorial

Hi all!  I didn't want you to think I'd fallen off the face of the earth, so I thought I'd share this tutorial I did last May.  Incase you were wondering, I just completed my Series 7 class (to get securities licensed) and have the test coming up on Tuesday.  Um, can you say STUDY?!?!!  Because that's all I'll be doing until then!  Yep, definitely feeling OVERWHELMED and stressed.  I really, REALLY want to pass the first time around (and therefore, am putting a lot of pressure on myself).  *thanks for letting me vent and positive thoughts and prayers are greatly appreciated*  On to the tutorial...

 I recently had some inquiries about how I made my felt cup coozie which you can see in the post HERE, so I decided to make a picture tutorial.  Like I said, I used a regular Starbucks cup thingie (goodness, not sure of the name?).  It measures approximately 10 1/2" X 2 3/4" and as you can see, there is a slight curve to it so it fits onto cups nice and snug.  I used the Sour Apple Felt I purchased from MFT.  It's a wool/rayon blend and when I say it's high quality, I mean, it's high quality!  AND they have 18 beautiful colors of it!  Serious *swoon*!  Trust me, I've tried to use the cheap stuff you can get from the bigger stores and it falls apart and you can't use it with any types of dies.  Period.  Don't waste your money.  ;)  {and ignore those Royal leaves I cut out of the coozie, please!  I hate to waste perfectly good corrugated paper!}


Once you've cut out the template, you want to have at least an inch overlapping.  I just folded up the paper coozie to see how much of an overlap it normally has and eyeballed it from there.  


Then I folded up my well-loved paper piercing pad and pierced 4 little holes as a guide for my needle.  Stay away from the very edge.  {ignore my non-manicured nails, please!  ;)  }


Once you've sewn your "X", loop the needle around the thread to make your final knot.  The thread I used is a linen/hemp type that I got from Michael's but you can find it just about anywhere.


Pull the loop down and tighten it as close to the felt as possible, as you see here.


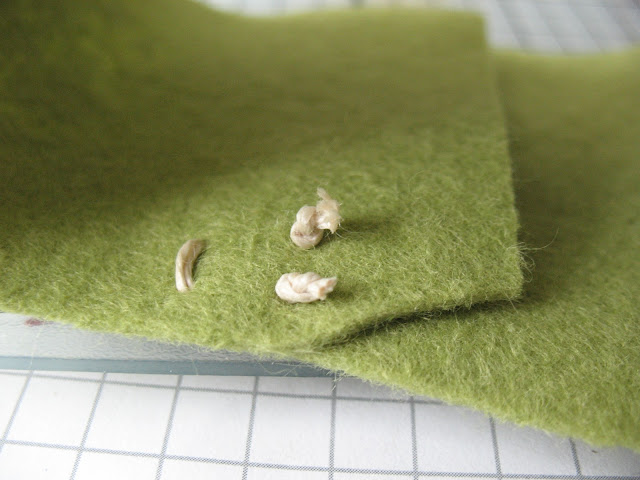
Then just cut off the excess thread.  Here's what the inside will look like...  And don't worry, it lays nice and flat once it's on your cup. 


One down, two more to go!  I originally only sewed two "X's", one at the top and one at the bottom, but once I slid it onto the cup, the middle kind of poked out, so a third "X" in the middle took care of that.  Plus, it just made it more sturdy.


And another peek at the finished result!  Now you're free to embellish it as you wish!


And here's a close up of the finished coozie!


Thanks for stopping by!


Saturday, March 9, 2013

Make a Wish!

Hi all!  Here's my card that I made for this month's MFT guest designer challenge.  I used the Cherry Blossom branch from their Inspired by Spring set, which I colored with copics.  I stamped it twice then cut it out using my Circle STAX 1 and layered it on my STAX 2, then I stamped it a third time but fussy cut it and popped it up over the other two for some dimension.  I added the large leaf-filled flourish die-namic behind the main image to really draw your eye to it.  I stamped the sentiment in MFT's Black Licorice ink from the Let's Toast stamp set onto the smallest of the Jumbo Fishtail STAX, which I topped with the little ruffled piece from the Banner Day die-namic.  I adhered that to the largest of the Fishtail Flags STAX.  A little paper piercing, faux stitching and bling add the finishing details.


A peek at the inside...  Another sentiment from the Let's Toast stamp set, again in Black Licorice, along with another little banner.  I layered the smallest stars from the inside of one of the Stacking Stars die-namics and the Star STAX.  


Close up...


 And another...


Thanks for stopping by!!!


Wednesday, March 6, 2013

Sister Act Card Challenge DT call!

Hi all!  I wanted to share a few of my favorite cards I've made as part of the Sister Act Card Challenge DT call.  Be sure to click on the link and check it out yourself!  Here are a few reasons these are faves of mine:

1.  They use some of my favorite tools - die-namics and copics
2.  They use stamps from one of my favorite companies, MFT
3.  They feature one of my favorite techniques, paper piecing (well, the card in the middle does)


Thanks for stopping by and wish me luck!!  ;)


Sunday, March 3, 2013

Hi all!  Here's my card for the MFTWSC113 using the a la modes Cowgirl at Heart.  She's colored with copics.  Some pink lemonade ribbon and a few die-namics add extra details.


Thanks for stopping by!

Friday, March 1, 2013

Howdy

Hi all!  Here's a card I made for SCS's Color Combo challenge #414.  The sentiment and boots are from MFT's Wild Wild West set.  I stamped the boots in their kraft ink and the sentiment using my espresso SU marker.  The little horseshoe is cut from the Country Charms die-namics in hot fudge cardstock.  The sentiment was cut out using the LLD Accent It - Flags & Tags die-namics (I sure do use those a lot!).  The celery cardstock was cut out using the postage stamp border die-namic and the pinking edge die-namic.  A little piercing and some twine finish up this Clean And Simple card.


Thanks for stopping by!


BLOGGER TEMPLATE BY DESIGNER BLOGS