Thursday, May 10, 2012

Blue Jay?

***You still have time to win my Blog Candy***

Hi all!  Here's a card I made for the Sketch Challenge and Ways to Use It Challenge on SCS this week.    I'm pretty sure this bird isn't a Blue Jay, but I really wanted to color him that way and use these designer papers, so here he is!  The bird and sentiment are both from the MFT set Inspired by Spring.  Their Inspired By sets are just beautiful!!!  I lightly colored him with copics, taking advantage of the shading on the stamp.  I've been wanting to try the two-tone effect I've seen around using the Mini Rolled Roses die-namic.    I love how it turned out!  I also added some Leafy Flourishes.  The sentiment was cut out using the Oval Tab.  A little bling and some piercing finish it off.


Detail shot of mini rolled roses...


Thanks for stopping by!


Wednesday, May 9, 2012

MFTWSC71

***Have I mentioned my Blog Candy??? ;) ***


Hi all!  Here's my card for the newest MFT sketch - MFTWSC71.  The is the a la mode Girl Talk.  She hadn't seen any ink yet and I thought it was time. ;)  I paper pieced her outfit and her cool phone case {I want one!} - more on that process below...  The flower embellie was made using the Prima Donna Petals die-namics with tiny brads in the center.  The layer behind this cool chick was cut out with the Vertical Greetings die-namic.  The sentiment, from the same set, was cut out with the File Tab die-namic.


Now more on the paper piecing.  I thought I'd share what I did for this particular card.  Once I decided which dp I was going to use, I stamped the image onto the dp, only inking up the necessary part.  For example, I don't ink up the entire image if I'm only going to need her sweater on the dp, know what I mean?  Here are the three pieces all cut out.  Please take note of the sloppy stamping to the left of her legs.  Before I noticed that, I had no intentions to fussy cut her, but after seeing the sloppy ink, I knew that I would have to cut her out.  Problem solved.  ;)


Here, you can see where her pants and sweater have been adhered.  I didn't completely cut out her hand and the phone because having that extra layer under the final piece only adds more depth.


Now that her phone cover has been attached, I also stamped her hands on some scrap paper, colored, then cut them out.  I love that it gives such a "real feel" to the image.  Also notice that I did cut out the empty space between her body and arm BUT I didn't when I cut her out completely.  Because the paper I layered her on was so light, I simply took a marker and colored that little bit of white in to match the paper so that it blended and looked like it had been cut out.   Go back up and look closely, you know you wanna!  ;)  And while you're up there, notice that her legs have a nice clean edge because that sloppy stamping was cut away.


Thanks so much for stopping by!  See you soon!


Tuesday, May 8, 2012

MFTWSC70

***You still have time to win my Blog Candy***

Hi all!  Here's my card for the MFTWSC70.  I've had this Pure Innocence Scientist inked up for about a week!  I already knew what dp I wanted to use, just needed the sketch to make it all come together!  She's colored with copics and fussy cut.  The "mixture" she's concocted was a happy accident - not sure what I was thinking, but I used red and blue copics and this happened!  Works for me! ;)  I used the Circle Stax 1 and 2 to cut out the dp and the black layer.  The scallop on the inside is actually the negative from the smallest Dizzy Doily Duo die-namic.  Because this card is so bold, I kept the embellishments rather simple - piercing on the red dp, a few pearls for the "bubbly" mixture and a button with twine to anchor the sentiment.


Here's a peek at the inside...  the dp with the measurements was too perfect not to add to the inside, as well.  The flask{?} is actually the martini glass from the Let's Toast die-namic just flipped upside down.


Thanks for stopping by!  See you soon!


Monday, May 7, 2012

TS Monday - time to shine!

***Check out my Blog Candy Post - these goodies need a new home!***


Hi all!  Happy Monday!  For this week's Totally Stampalicious Monday challenge, we want your creation to shine!  Yes, add bling, glitter, anything that sparkles, to your project!  I decided to use Gus and Stella Anniversary.  I fussy cut them and made it look like they were inside with some fancy wall paper and flooring, ha!  I used a glue pen and glitter to add sparkle around the sentiment, on the layer below the main layer and on the layer behind Gus and Stella.  I also added bling to the holes of the monarch border die-namic.  The sketch is the SC383 from SplitCoast. 


Thanks for stopping by!

Thursday, May 3, 2012

Felt cup coozie tutorial

Hi all!  I recently had some inquiries about how I made my felt cup coozie which you can see in the post HERE, so I decided to make a picture tutorial.  Like I said, I used a regular Starbucks cup thingie (goodness, not sure of the name?).  It measures approximately 10 1/2" X 2 3/4" and as you can see, there is a slight curve to it so it fits onto cups nice and snug.  I used the Sour Apple Felt I purchased from MFT.  It's a wool/rayon blend and when I say it's high quality, I mean, it's high quality!  AND they have 18 beautiful colors of it!  Serious *swoon*!  Trust me, I've tried to use the cheap stuff you can get from the bigger stores and it falls apart and you can't use it with any types of dies.  Period.  Don't waste your money.  ;)  {and ignore those Royal leaves I cut out of the coozie, please!  I hate to waste perfectly good corrugated paper!}


Once you've cut out the template, you want to have at least an inch overlapping.  I just folded up the paper coozie to see how much of an overlap it normally has and eyeballed it from there.  


Then I folded up my well-loved paper piercing pad and pierced 4 little holes as a guide for my needle.  Stay away from the very edge.  {ignore my non-manicured nails, please!  ;)  }


Once you've sewn your "X", loop the needle around the thread to make your final knot.  The thread I used is a linen/hemp type that I got from Michael's but you can find it just about anywhere.


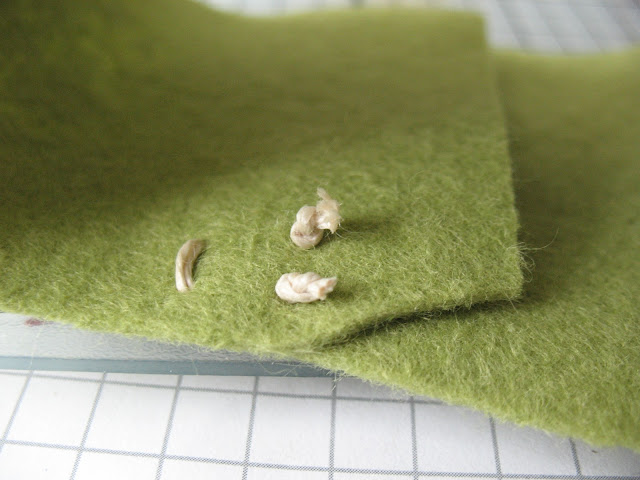
Pull the loop down and tighten it as close to the felt as possible, as you see here.


Then just cut off the excess thread.  Here's what the inside will look like...  And don't worry, it lays nice and flat once it's on your cup. 


One down, two more to go!  I originally only sewed two "X's", one at the top and one at the bottom, but once I slid it onto the cup, the middle kind of poked out, so a third "X" in the middle took care of that.  Plus, it just made it more sturdy.


And another peek at the finished result!  Now you're free to embellish it as you wish!


Thanks for stopping by!

Tuesday, May 1, 2012

Teacher's Pet project #2!!!

*2nd post of the day*
***check out my Blog Candy Post***
Well, hello again!  Here's my second project for this month's MFT guest designer contest - Be a Teacher's Pet.  I said it before, if you want to be a teacher's pet, let them know that they're appreciated and help them stay organized!  For this project, I added a little cup coozie that I made from MFT felt!  Yes, people, I sewed something other than a button!  HA!  Because we know teacher's love (need??!) their caffeine!  ;)  Here's a picture of all three items together...


Here's a picture of the clipboard.  I know that when I worked at a school, there were always some important daily notes, like little Susie was taking the bus home instead of going by car or little Jimmy had to stay after school for book club, etc... so I thought this would be helpful to have hanging by the door with all of these notes attached.  I love that An Apple for Teacher a la mode!


Here's a close up...

Here's the matching card.  I wanted a tone on tone faux embossed look with the letters which I cut out using the By the Letters uppercase die-namics.  How gorgeous is that Royal Rose die-namic?  The royal leaves were cut out using the Starbucks cup coozie that I used as my template.  Little clusters of blue bling balance out the other side of the sentiment.


Close up...

And here's my fabulous stitching!  LOL!  Hey, not too bad, right?  It definitely did the trick!


Here's a picture of the front where I added one of the sentiments from the An Apple for Teacher a la mode and another Royal rose with leaves to match the card.


Ok, phew, I think that's it for me today!!!  Thanks so much for stopping by!!!  It's much appreciated!!!


Teacher's Pet

***check out my Blog Candy Post***

Hi all!  Here's my first project for this month's MFT guest designer challenge - Be a Teacher's Pet.  I used to work at a school and now that if you want to be a teacher's pet, let them know that they're appreciated and help them stay organized!  First, I took an 11x14 document frame and  made a class birthday chart to be hung on the wall in the classroom so everyone can see each other's birthdays!  I stamped out each month using their Inspired by Months of the Year stamp set, then cut them out using the tag from the Tag, You're It die-namics.  I used a different stamp or die-namic to represent something significant that takes place during that month.  I used copics to highlight certain parts of the stamps for extra interest.  The "B" and "C" were cut out using die-namics but the rest of the title was stamped with versamark and embossed with black embossing powder.  I used 10 different stamp sets and 8 different die-namics just on the chart alone!


Detail shots...


And here's the card to match...  like I said, a teacher loves to know that they're appreciated!!!  I used the  MFTWSC69 sketch.


The inside...


And here they are together...


Thanks for looking!  Don't go too far...  I have another project I made for this contest!  *wink*


BLOGGER TEMPLATE BY DESIGNER BLOGS